Blog
DIY Standardized: How OpenSFF Can Streamline Homelabs and Home Servers
Introduction
We’re big fans of home servers and homelabs here at OpenSFF. In fact, the very idea for our specifications was born in the midst of creating a home server. So we’re deeply aware that these systems are entrenched in DIY territory. Enthusiasts, small business owners, and eager experimenters often build their systems from a mix of new hardware, refurbished enterprise equipment, and old consumer devices.
This niche thrives on creativity, resourcefulness, and a desire to make the most out of what makers can get their hands on, often with environmental sustainability in mind. But everything has a trade-off. Combining devices from different vendors and generations usually leads to awkward form factors, a mess of cables, and mismatched performance. While tweaking, maintaining, and upgrading are all parts of the fun of having a home server, we do wish that these activities were more streamlined and involve less guesswork.
In this post, we’re going to look at several builds shared on the r/homelab and r/minilab subreddits and imagine what their creators could put together in a world with OpenSFF.
Build 1: Mixed hardware stack by u/knlklabacka
Our first example comes from Redditor u/knlklabacka, whose minilab is a quintessential home server.
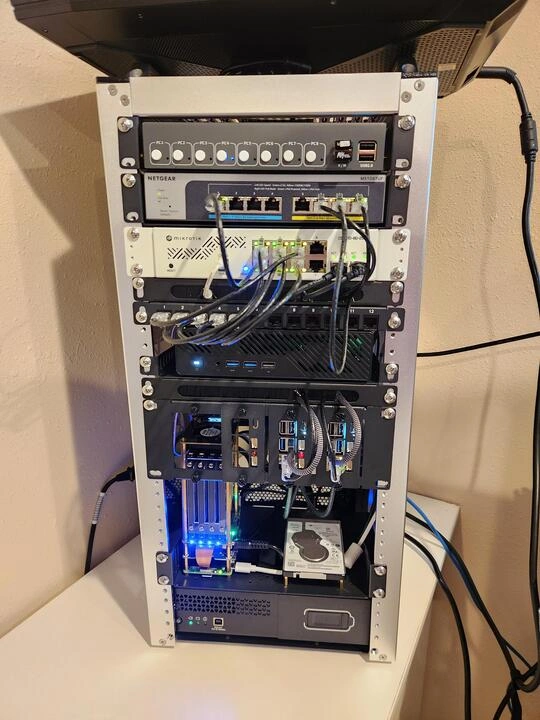
Built for software development and experimentation through Proxmox, ad blocking via Pi-hole, and to serve as a NAS, u/knlklabacka’s setup comprises:
- A GeeekPi 12U cabinet
- An HP Omen gaming laptop (it’s not fully visible in the image, but it’s simply perched on top of the cabinet)
- A MINISFORUM MS-A2 mini PC
- Two Raspberry Pi 5 units clustered
- Another Raspberry Pi 5 with SATA hats
- A NETGEAR 8-Port Ultra60 PMS108TUP switch
- A Tupavco TP1713 rack-mountable power strip
- An APC Back-UPS Slim BV400XU
The system serves u/knlklabacka’s needs and we’re sure they had a ton of fun putting it together. That said, it does have a few aspects that we believe an OpenSFF variant would be able to address.
First off, the gaming laptop’s footprint clearly makes it awkward to place alongside the rest of the hardware. We wouldn't be surprised if the laptop or the mini PC can't be serviced with minimal tools. The creator also mentioned in the post comments that they had to test two different UPS systems due to fitment issues. Finally, the external switch adds more cabling and clutter.
With OpenSFF, u/knlklabacka could have:
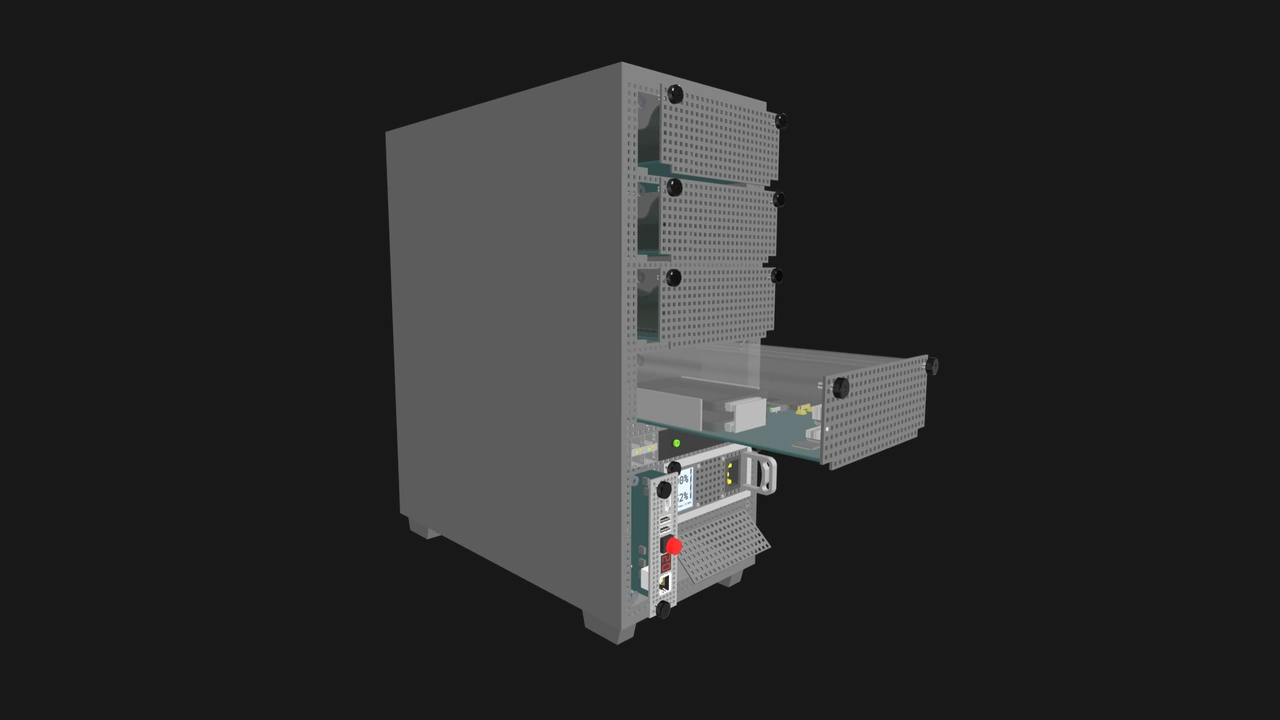
- A multi-node Enterprise Enclosure, which would come with:
- Integrated backplane switches with PoE uplink ports
- A full-featured Management Module to provide chassis-wide KVM switching and monitoring
- A shared PSU
- A UPS
- Front-accessible and toolless Compute Node bays
- A high-performance Compute Node in place of both the laptop and the mini PC
- Two low-powered Compute Nodes to replace the Raspberry Pi cluster
- A storage Compute Node with SATA bays to replace the Raspberry Pi NAS
Even if u/knlklabacka sourced the Compute Nodes and Enterprise Enclosure from different vendors or mixed old and new components, the Compute Nodes would slot in perfectly into the Enclosure, making for a cleaner setup. All Enterprise Enclosures have internal network switches, eliminating the need to wrangle a switch into the setup.
Similarly, Enterprise Enclosures come with at least one power supply for shared power delivery and at least one additional PSU slot for redundancy. Enterprise Enclosures can also have a UPS bay, further integrating all components.
Build 2: ITX Minilab by u/1nssein
Our next build is another mini homelab, this time from Redditor u/1nssein, who upgraded from a cluster of Raspberry Pis to a single ITX motherboard.
The Redditor built these two labs to brush up on Kubernetes and Terraform, manage their home automation system, and host a private cloud for their family. The upgraded one has:
- A DeskPi Rackmate T1 cabinet
- An MSI MPG B650I Edge ITX motherboard
- A Ubiquiti Flex 2.5G PoE switch
- A JetKVM remote KVM device
This setup is clean and compact; we’ll never get tired of seeing patch cables neatly arranged. But once again, the switch is external and exposes the cables. As nice as the Rackmate looks, we can also clearly see that the motherboard is simply shelved into one of its bays. The JetKVM, while proving to be one of the rare Kickstarter gems worth supporting, is also a distinct component.

In a world with OpenSFF, u/1nssein would be able to meet his needs using:
- A single-slot Core Enclosure, which would come with:
- An integrated backplane switch with PoE uplink ports
- A full-featured Management Module to take care of KVM duties and remote management
- A front-accessible and toolless Compute Node bay
- A PSU
- A Compute Node equipped with a high-core count CPU
Such a setup would be cleaner and have far fewer cables visible. In addition, if OpenSFF parts were available, u/1nssein’s upgrade path would have been straightforward. They could’ve started with a Compute Node and a more basic Core Enclosure, then upgraded to our recommended Enclosure that has a Management Module and integrated switch. The same Compute Node that powered their starter lab would seamlessly slot into the larger and fully managed Enclosure. Our interoperability means upgrades can easily be evolutions instead of overhauls.
Build 3: Portable air-gapped microlab by u/arocnies
Our third build is from r/homelab member u/arocnies, who’s made an offline and portable learning environment. Specifically, the Redditor wants to play around with Kubernetes to learn devops services such as Keycloak, Backstage, and ArgoCD.
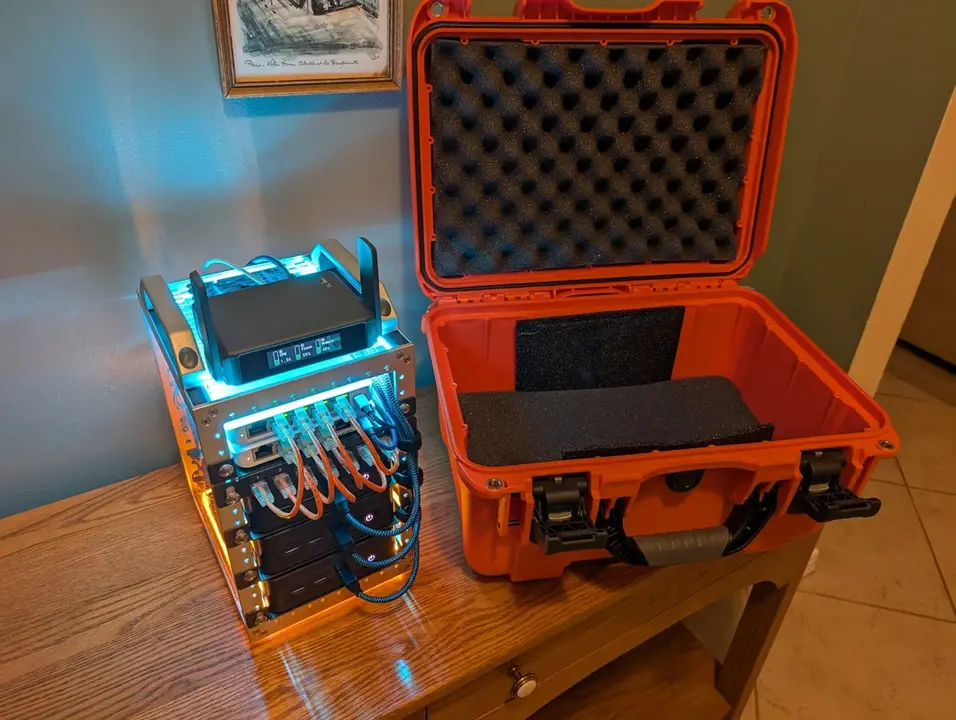

This portable lab was designed to fit in a Nanuk 918 hardcase. The components have been reinforced with adhesive mounting strips to help hold them in place. It’s made of:
- A DeskPi Rackmate TT cabinet
- A GL-iNet Slate7 router (to connect to the lab’s network)
- Two UniFi Flex Mini 2.5G switches (one for storage traffic and another for service traffic)
- Three BOSGAME P4 Mini PCs (each with a Ryzen 5850u CPU, 32GB DDR4 RAM, and 1TB NVMe of storage)
- A UGREEN 300W power supply
- A 90mm slim fan for exhaust
- A 120mm slim fan for intake
The power supply is key to u/arocnies’ set up. In the setup shown in these photos, u/arocnies used a Shyvana 760W GaN5 power supply. It has 10 USB charging ports, including four USB-C ports that can supply up to 120W. That pairs well with the BOSGAME P4 as it supports USB-C PD. In theory, only one socket is needed to power everything. However, when we reached out, u/arocnies said they did further research and no longer trusted the quality of the device. So they went with the UGREEN power supply instead.
Finally, we see once again that there are many cables exposed externally, including the USB-C cables used for power.

Rebuilt with OpenSFF-certified or compatible components, we imagine u/arocnies’ setup would have:
- An Enterprise Enclosure with:
- Front-accessible racks in an open frame
- A full-featured Management Module for remote KVM and out-of-band monitoring
- Dual-network backplane switches (2.5GBe with VLAN and PoE support) to replace the Flex Minis and Slate 7 router
- A shared PSU
- Three Enterprise Compute Nodes with a power-efficient CPU and the same amount of RAM and storage
This version would be able to power all the components while also being easier to use and service. In addition, since the Enterprise Compute Nodes share power through the Enclosure, the total of six USB-C ports that u/arocnies would get from this OpenSFF build would all be free to plug into.
While making the render for our recommendation, we saw that it’s entirely possible for this OpenSFF build to also fit in the Nanuk 918. That retains u/arocnies’ option to pack it in the hardcase for extra protection in transit.
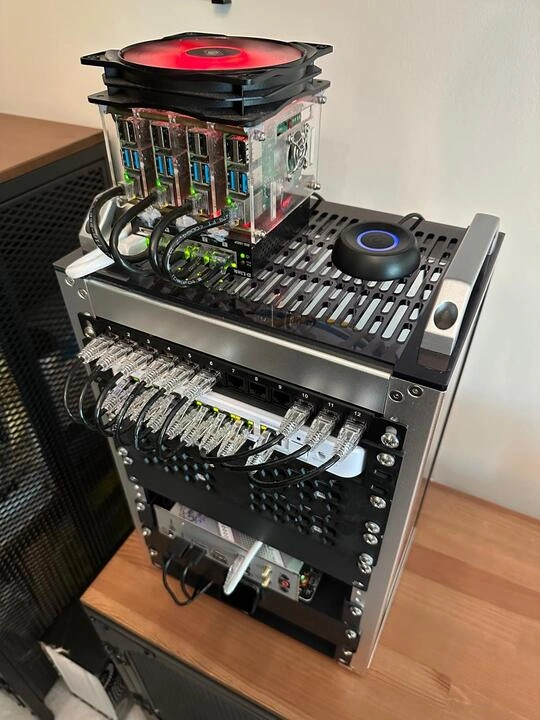
Build 4: Custom Designed Minilab by u/klayf
This work of art from u/klayf96 is called Firebolt. It’s built around the Rackmate T1, but with panels that u/klayf96 designed and 3D printed, taking inspiration from other Redditor-made builds.
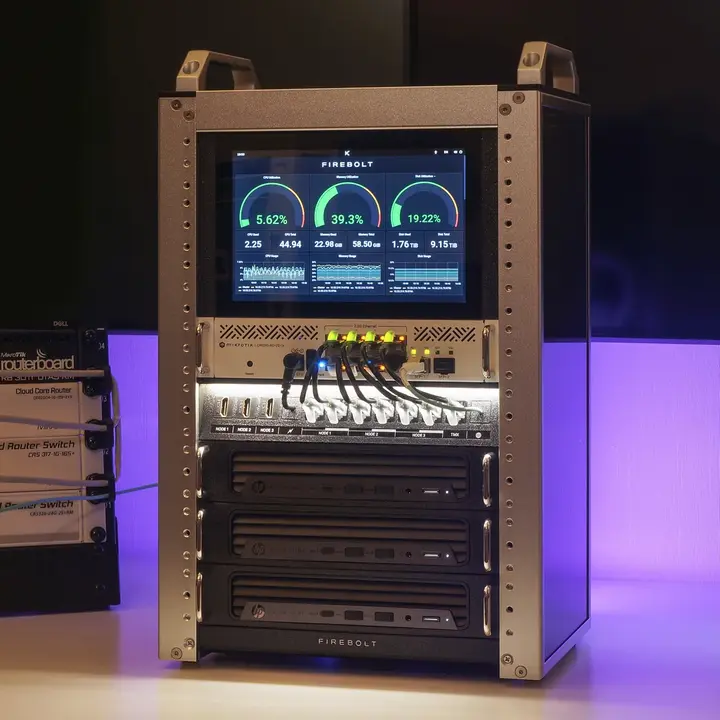

Firebolt is used primarily for experimenting with HCI setups on Proxmox and Harvester. Besides making the minilab look awesome, u/klayf96 focused on low power consumption and noise, as well as keeping the lab as small as possible for easy storage and transport. Firebolt is equipped with:
- A DeskPi Rackmate T1 with custom made panels
- Three HP Elite Mini 800 G9 PCs
- An Intel N100-based Mini PC
- A CWWK X86-P5-N100 router
- A MikroTik CRS310-8G-2S+ switch
- An IPistBit 8” touchscreen that displays custom made dashboards
- A separate Eaton UPS
Firebolt is as slick as a mini homelab can get, and u/klayf96 did their best to manage the cables and plugs at the back. But it still has separate power supplies, not to mention the UPS doesn’t fit in the space-constrained rack. Further, the stock fans in Firebolt’s switch were loud. Even after upgrading to Noctua fans, u/klayf96 says the setup is still noisy.
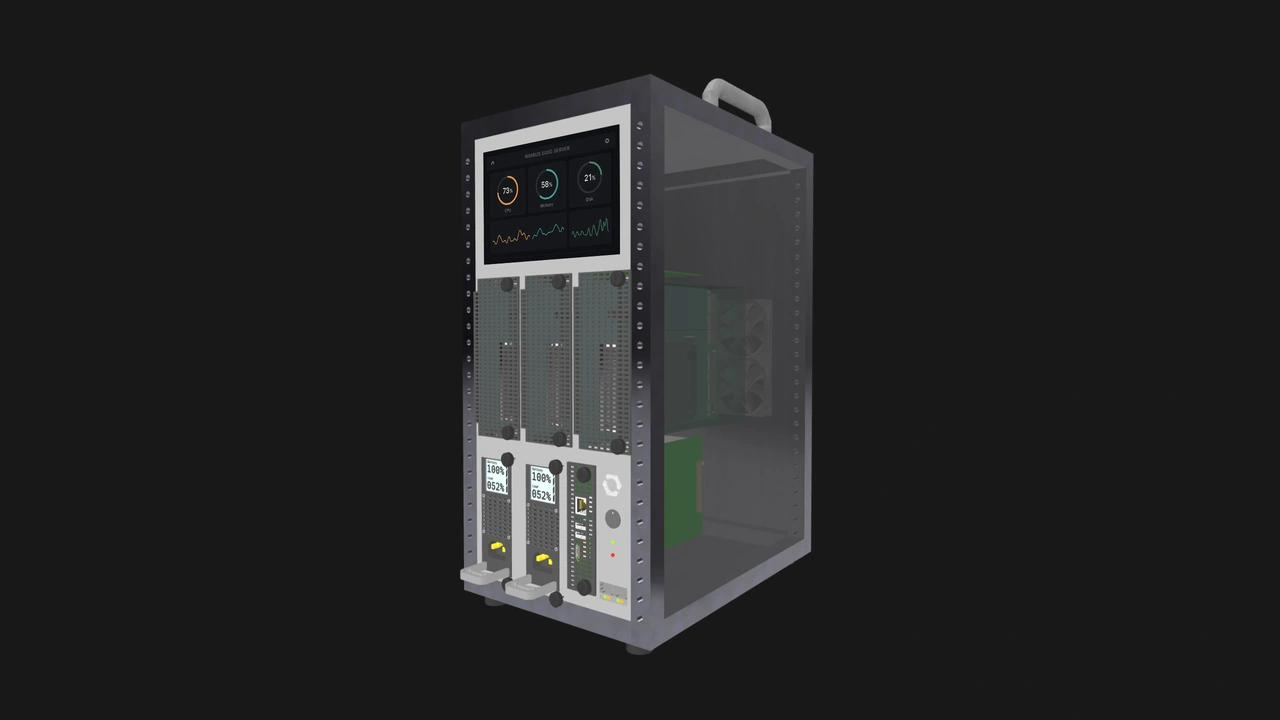
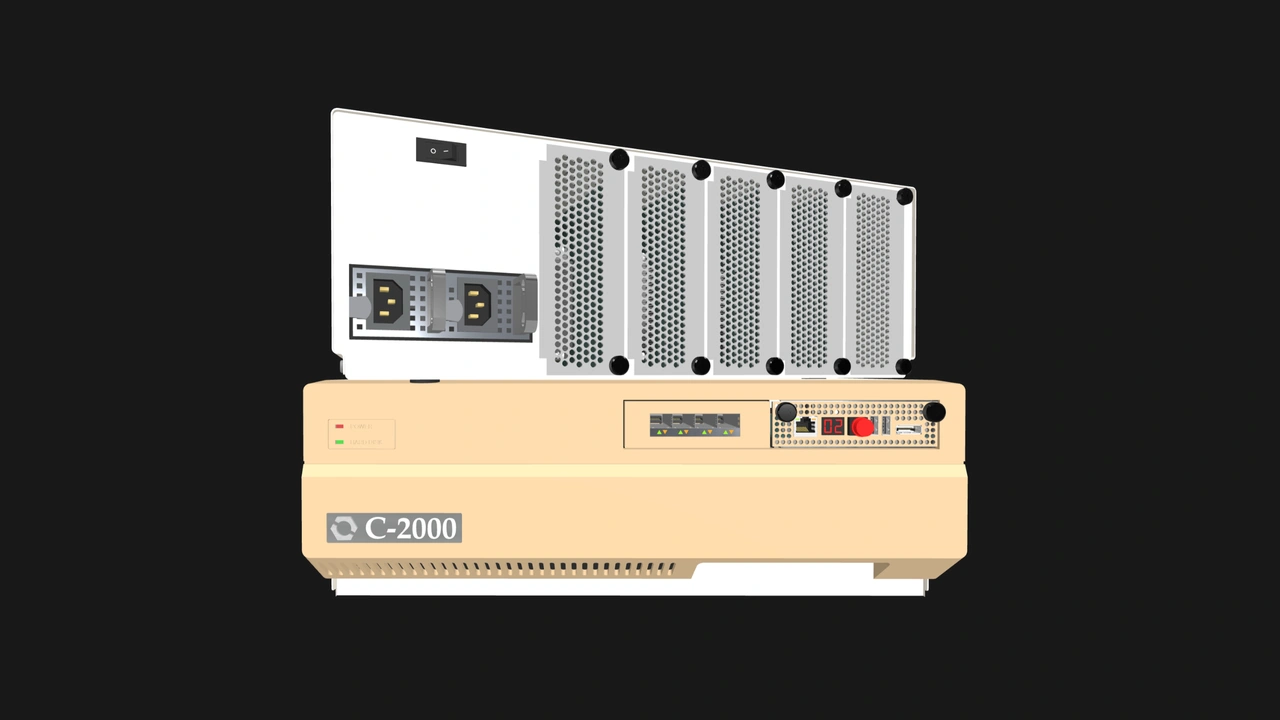
Here’s what we think its OpenSFF version would have:
- An Enterprise Enclosure with:
- At least three Compute Node bays
- Integrated backplane switches with 10G PoE uplink ports
- A firewall router
- A full-featured Management Module for remote management and possibly integration with an attachable or built-in touchscreen module
- Multiple PWM fans
- A shared PSU
- A UPS bay
- Three Compute Nodes with power-efficient CPUs
We concede that the OpenSFF variant would be figuratively less cool than Firebolt. It would also be significantly larger due to its integrated PSU and UPS bays. But it would be quieter, easier to service and manage, and literally cooler under load.
Build 5: Sleeper Raspberry Pi Cluster by u/xrothgarx
Firebolt is a tough act to follow. Unless you’re developer and podcast host Justin Garrison aka u/xrothgarx. Here’s his majestic work-in-progress:
If you’ve read this far, you’ve undoubtedly recognized the iconic case design of the WRT54G series of routers and other Linksys gear from the early 2000s. Justin lobotomized several such devices and stacked them together to form a truly one-of-a-kind rack. Inside these plastic relics are:
- A GMKtec Nucbox M6 mini PC
- Two Raspberry Pi 4 units with PoE hats
- Two Raspberry Pi 5 units with NVMe+PoE hats
- A TP-Link switch
Justin says he plans to add an external GPU, more compute units, a 250W PSU, and a JetKVM to the rig. That’ll be quite the stack of Linksys cases.
As we mentioned in our article about OpenSFF Enclosures, we’d also love to help builders have systems that look unique and fun. The interoperability built into the specifications means vendors would potentially have a larger customer base. Case manufacturers and system integrators could therefore be more inclined to make visually interesting Enclosures and accessories.
While we can’t match the authenticity of hollowed out Linksys cases, we imagine we can at least have a sleeper homelab that has:
- An Enterprise Enclosure with a retro design (we would love to see designs based on the Amiga 2000 or 3000T) and:
- At least five Compute Node bays
- Integrated backplane switches with PoE uplink ports
- A Management Module
- A shared PSU
- One high performance Compute Node
- Four low-power Compute Nodes
Build with OpenSFF
We know the joys of creating, running, and (endlessly) upgrading a home server. Using something that you built yourself is one of the best ways to embrace imperfection, continue learning, and maximize your resources. A major reason why we created OpenSFF is to help make these DIY systems easier to put together, and be more serviceable and sustainable in the long run.
We’d like to thank u/knlklabacka, u/1nssein, u/arocnies, u/klayf96, Justin Garrison, and all the other creators at r/homelab and r/minilab for sharing their passion for home servers and DIY in general.
If you enjoyed reading this, we would be grateful if you could help us spread the word about OpenSFF and our specifications. For technical clarifications, partnerships, and other inquiries, reach out to our development team at [email protected].
Other Articles
Meet OpenSFF: an open hardware standard that enables cross-vendor compatibility, modular systems, and sustainable hardware reuse.
August 11, 2025
We go over the rise of virtualization and the open software adopted by home server enthusiasts, as well as the current challenges and the future of the hobby.
September 06, 2025

Learn why OpenSFF adopted the SFF-TA-1002 connector standard and how it enables our vision.
September 18, 2025